Monday, November 17, 2008

Cruisy Spots Los Angeles

17.11.2008

It is finished, the inlays are in the fretboard.
I could now dwell on the details, but that is really unnecessary.
The most complicated piece of work is behind me, And this is, after 4h milling and 3 h bonding and grinding out: it is important

that the guitar does not wobble to which I have supported the neck with cork and helps the body with cherry stone pillow.

inlays with Tipp-Ex stick, accuracy will decide at this point about the eventual seating of the inlays.
then outline with a needle.

Photobucket - Video and Image Hosting


Photobucket - Video and Image Hosting


Photobucket - Video and Image Hosting


Photobucket - Video and Image Hosting


Photobucket - Video and Image Hosting


Then we went off with 180 grit paper,
Photobucket - Video and Image Hosting


Photobucket - Video and Image Hosting


Photobucket - Video and Image Hosting


Photobucket - Video and Image Hosting


after 2.5 h and was finally all on one level. Then, with 320s, 400s, 600s and 1200s ground to finish. There goes even more, I was at half past 2 hours in the morning just not fit enough. : Other D

Photobucket - Video and Image Hosting


Photobucket - Video and Image Hosting


impurities way, I have yet repaired with super glue and sanding dust: a paper towel moistened with universal and dip into dust, then a tiny drop of super glue to give the Verstiefung and immediately roto the sanding dust. Everything that can be taken at the point of adhesive, is pressed into the hole and then wipe the excess from the thinner muck away.
Collapsed very good.

now are some more hurray to Bundi and installing the hardware,!

Ppf Against Mutual Funds

15.11.2008

to grind closer To the fretboard, I have me in a hurry again milled with a radius block itself. Process basically like this: http://www.projectguitar.com/tut/radius.htm, only with smaller utensils.

between the two strips on the wall you can slide the workpiece to be milled before the Perpendicular cutter up and down while the cutter, which is at a distance of 12 "(desired radius) is fixed against the wood pushes.


Photobucket - Video and Image Hosting


Photobucket - Video and Image Hosting


Photobucket - Video and Image Hosting

was already on quarrying, as I made the picture, which is no longer the front of the cable ties off if you just hinseht. The small
Billigdremel liked the way not the side position, have the block just got so exhausted. Speed went down to the block and kept getting louder. Sounded to camp. In the vertical, we went just fine later on, after I held him, turned and "stirred" in the air, almost against his own imbalance have. Since the speed was high and the sound was good again.

At the end of the radius block may have become good, but would still have been better if I had given me to the wall and the strips more trouble. The Dremel die made me frantic. The best way to build
well as in the tutorial and then: mount, mill, loosen off, start again, fix, mill ...
Or just buy it next time, dear one .. Hm

How To Write Tv Show Proposal

05.11.2008

Small digression on headstock and logo in gold: making

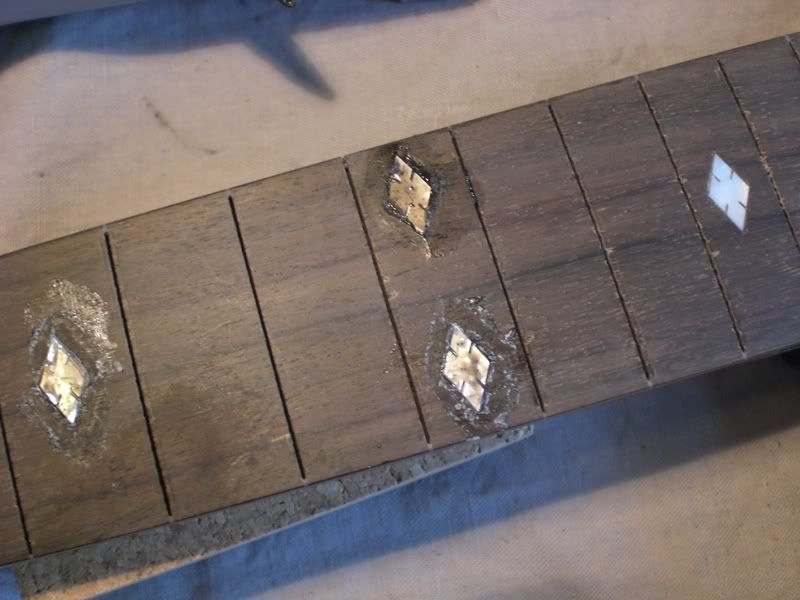
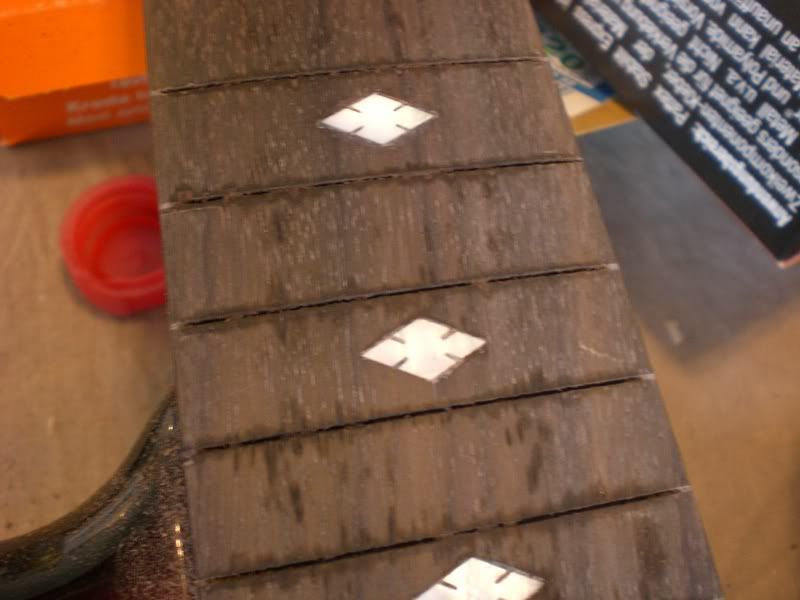
consider I, a logo for the GP, offered to make a test on the aforementioned garbage guitar on which I also inlays and have practiced the Bundi.
so-called Golden Decals can not create at home, unfortunately without any further because no printer prints the color gold. Here is the tutorial, after I have worked for: http://www.projectguitar.com/tut/logo.htm

Here's the process:

Such was the headstock from before, which I have for aesthetic reasons, the extent of existing allowed, adjusted:

then designed the first of the new decal and printed with laser printer (with 900dpi) on overhead projector film mirrored. Unfortunately, there is no mwn water slide film, which can be printed on the adhesive side, which would have gone unseen in the paint. To many, the film is certainly a little too thick, you'd have the whole thing complicated and slow grind leveling with 20 coats of paint, plan to get it all. But the old Fender decals are stuck on even the painted headstock and visible about it.

printing on overhead projector film mirror, provided
the printed page with Edding gold pin,

Photobucket - Video and Image Hosting


Photobucket - Video and Image Hosting


In Project Guitar tutorial is used as a sealer Mod Podge. A so-called glue napkin for me so far unknown tasteless handicrafts common. In this country, to not get anywhere, so let me have a craft store for more advice and after I have harvested a lot of eye rolling for my annoying questions, then bought
called decoupage varnish. Makes probably the same as Mod Podge.

Then I, just like in the tutorial and on the can of spray adhesive described, the applied adhesive and allow to dry slightly down before the decal druffkam


Photobucket - Video and Image Hosting


Photobucket - Video and Image Hosting


pressed then meticulously with a toothpick and air from below.
then only removed with cleaning fluid spray all of the top plate and allow to dry. This is then followed

the paint. Since I already had some dealings with cans and even though everything had to quickly go fast and the groundwork was not carried out meticulously, the paint has failed so bad.

Ching follows: Dose in hot water with some 35 °, head plate with a hair dryer to warm up similar temperature warm up a bit. Sufficient temperature is quite important when painting, was mentioned only once. Is often forgotten. The viscosity and the drying run much better then.
draufgenebelt Then a thin layer of 30-40cm away. Then, with the hair dryer upside down on it held so the varnish on it attracts the same and stuck dust.
The procedure three times done and then applied a thicker layer. The then angefönt and allow to dry.
And this is the thing now from:


Photobucket - Video and Image Hosting


Photobucket - Video and Image Hosting


with subsequent grinding and buffing the thing would of course become more chic, but I lacked the time, resources, and then I was not worth the trouble.
In reality is also much better than in the photos. By the way, I'm not surprised
bad, how good the guitar sounded after the set was even reasonable. Despite the cheap PUs and the transparent sliding caliper.

How To Get Auto Mechanic Licence In Ontario

03.11.2008

The guitar is in good ol 'tschörmenni. My brother and I picked her up at the weekend, just after the arrival started drinking beer, spent a very great day and evening with an extremely cute and funny guitar maker in Zagreb. then slept with him in the booth and in the morning hung over, then flown back.
I can not describe the feeling of seeing the guitar in real life.

flies made with my guitar in advance very much worry, the most comprehensive research also could not dispel.
Even my air Hanseatic brother could find here no more substantial information in terms of driving as hand luggage. But even for the record, if you want to fly with Lufthansa and would not give up his guitar, MAY tariff for the pure (ie without control and fees, which make up some 80% of the ticket price) a book extra seat. This is only for firm bookings.
give up the guitar Flight case is not really a problem, unless it falls down from 10m or is flattened by a vehicle on the runway. but this is unlikely. All stories about
schlunzende Packer, flying cargo in the hold or dramatic temperature drop there are paranoid. I'd make the same, but I'm very skilled place can be explained that

first normal cases are sensitive and difficult than a flight case with a guitar, so therefore do not have to be balanced and therefore less likely fall off or break. How often have you already seen a broken suitcase on the baggage carousel? I almost never. And I've flown many times.

2. The cargo is stowed in the cargo hold good. Since May not flying around, that's not very cool for flying.

third This is the temperature differences nonsense. The cargo area is technically part of the cabin design is therefore supplied with the same pressure, air, and the same temperature. The outer shell of the aircraft, isolated from the cold. What can condensed air, which cause the outside temperature of -60 ° C at times in an aircraft and its cavities, I've seen in pictures. There are the same as 15-25 ° in the cabin. Here it is in the car in the winter cold.

Only a flight case is reasonable, so do not push other pieces of luggage a plastic or plywood case can.
I unfortunately did not have a flight case / could buy or wanted and I always wanted to take the guitar in the cabin, got me the good builders an ABS case and I cherished the hope that the guitar to be able to take as hand luggage. When I return flights for two (Zagreb Munich, Munich - Hamburg) was able to pick up the guitar without objection in the cabin, I was quite relieved. There are just behind the front galley on the most right a wardrobe that is closed during the flight. Since not wiggles more than NEM in the trunk.
would be at low cost as Ryanair difficult.


Photobucket - Video and Image Hosting


Photobucket - Video and Image Hosting


Saturday, October 11, 2008

Akiyama Kasumi Hotfile

11.10.2008

Here are the first pictures of the painted guitar. Overall, pretty tasty. Since again let anybody tell you black is boring.
only drawback: some sites on the binding have been masked by the false and too late already dry paint was removed. Unfortunately, the painter has followed this is impossible, (which I can hardly imagine) and then lacquered.
discuss just that the painter can be ran on it already. Overall, relatively little damage, the Great does not stand out, but I think it's beyond my tolerance limit. Possibly at the points then sanded again, Black rework, clear lacquer and then polished.

However, the overall impression makes me very happy. See for yourself:


Photobucket - Video and Image Hosting


Photobucket - Video and Image Hosting


Photobucket - Video and Image Hosting


Photobucket - Video and Image Hosting


Photobucket - Video and Image Hosting


Photobucket - Video and Image Hosting


Photobucket - Video and Image Hosting


Here are the points mentioned :


Photobucket - Video and Image Hosting


Photobucket - Video and Image Hosting


Monday, September 8, 2008

Best Beginner Hunting Bow

08.09.2008

So here's a small intermediate step.
to an old Johnson Baltimore Müllklampfe that somehow still standing around, I have the weekend (quite successfully in fact) made my first attempts at inlay work.
On my order with great StewMac I ordered it pre Diamonds.

The first thing I've sorted and labeled them so I know later how to be fitted.

Photobucket


then glued the squares with glue on the points in order to outline it. At the first session I had außreichend lighting, you should take care of but in any case, very good lighting. The time up front. And you better not make the outline with a scalpel, even if we think that so you can work very fine, because that is not really stiff enough.
come Then again, the inlays and the millings are made.
is first with a very fine mill (0.3 mm) milled with the chalk outline made visible, then removed the inner material. The most important thing here is patience, not to high speed and good preparatory work (glue / Outline).

Photobucket

Each individual is measured in thickness and adjust the drilling depth to it. It should MMN after gluing all look out rather a 1 / 10 mm, than to sink deep in the fretboard, as the need to grind behind everything again for the inlays to the fingerboard
are flush. Again and again you can interrupt the drilling-and look to be worn out already still has. The more one removes, the more visible to the bond is later.

Photobucket

Then I Pattex with stability, a 2-component adhesive (similar to super glue) to acrylic which cures harder than 2K epoxy adhesive, glued the inlays. The glue is brownish, which meets on a brown wooden handle a board.

Photobucket


At the first session I had glued the top 4 frets and the glue is mixed with Palisanderstaub, then the second a little black pigment added, in order to tint the adhesive further. Dear one or two shades darker than the fretboard, then you do not see the adhesive Sun In ebony no problem at Rosewood, however difficult.

Photobucket


connecting ground off and happy. Has become quite good. My Fräßskills I can definitely further expand, and this can already be seen.

Photobucket

Photobucket

Photobucket

Photobucket

Photobucket

I have to rest in a Korkklotz a radius sanding block self-made. First I have put 320s
sandpaper on the fretboard to first rude to come in the right direction. Then I got on the end of the fingerboard fixed carbon and thus block the job on the grinding marks, the rest. This then so far I have filed down and polished until the block rested evenly.

Photobucket

Photobucket

Photobucket